Other articles in this series
SETTING UP A TELESCOPE FOR THE FIRST OBSERVING SESSION
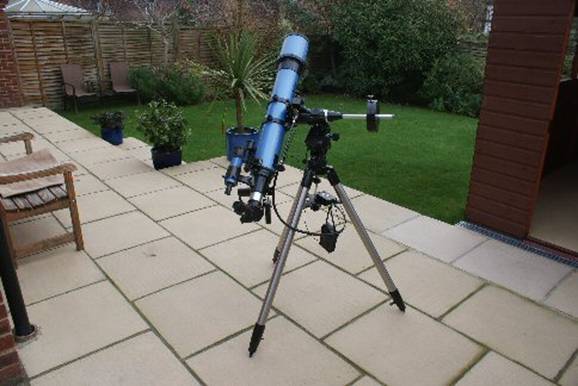
The telescope
assembled in the previous article Telescope assembly
In this article the guidance is of a general nature as
each telescope has differences in design depending on the supplier and the
components used. Illustrations are from
the Skywatcher 120mm f1000 refractor assembled in the previous article. The Skywatcher
120mm is fitted to an EQ5 Equatorial Mounting on a Field Tripod.
It is first necessary to correctly align and level the
telescope mounting or it will not track objects correctly as they appear to
move across the sky due to the rotation of Earth. First a few words about alignment. In the northern hemisphere the best direction
to align the telescope is so it has its best view to the south. The reason for this is to do with the tilt of
Earths axis of rotation. Earth is
tilted approximately 23.5° to the plane of the solar system and we in the UK are
located towards the north of the planet.
If an imaginary line is projected from the north pole of
Earth it will point approximately to the star Polaris in the constellation of Ursa Minor (the Little Bear). Because we are located 51° north, Polaris is
positioned about 38.6° north of our zenith (the point directly overhead). Polaris is almost on the axis of Earth
therefore it appears to remain stationary with the whole sky rotating around it
every 24 hours. If we mount our
telescope facing south we will be able to see 128.6° (90° + 38.6°) of
declination (elevation) of sky rotate through our line of sight (from the south
horizon up to Polaris). If the telescope
was aligned to face north only 51.4° (90° - 38.6°) would pass the line of
sight.
The first thing to do
when setting up the telescope is to establish where south is. A simple compass is good enough if visual
observing is the aim. However if long
exposure photography is planned then more accurate alignment will be
required. If the mounting has not been
fitted to the tripod stand then the compass can be positioned on the mounting
head and the north mark on the stand aligned with the compass needle. The compass may otherwise be positioned close
to the mounting which can then be aligned to the needle.
Do not at this stage align the mounting too
accurately because the height and level may need to be adjusted.
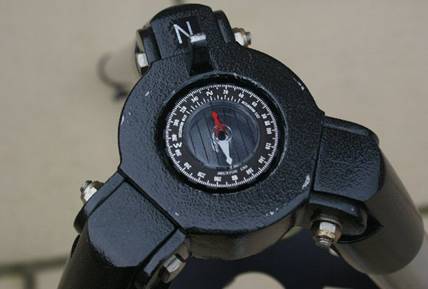
Figure 1 A compass
positioned on the mounting head
Extend and lock the tripod legs to the
required height. Use a bubble gauge to
level the tripod.
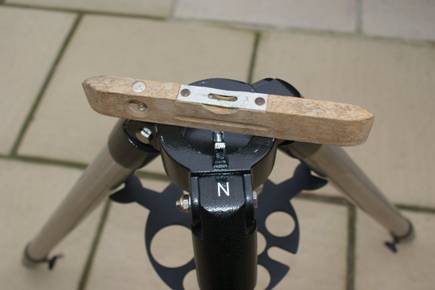
Figure 2 A bubble
gauge used to level the tripod
If the telescope is already fitted to the
tripod the bubble gauge can be placed or held on a horizontal part of the
mounting. Some mountings have an
integral bubble gauge that makes levelling much easier. When levelled re-check the alignment to north
with the compass and adjust the position of the stand if necessary.
If the telescope and mounting are not fitted
then complete the assembly as described in the article for assembling the
telescope. When assembly is complete we
can move to the next stage of setting up.
The next operation is to raise the RA axis of
the mounting so that it is aligned on Polaris (the North Star). Polaris is very close to the Celestial North
Pole. This is the point in the sky where
the axis of Earth appears to point in the northern sky. See the diagram below.
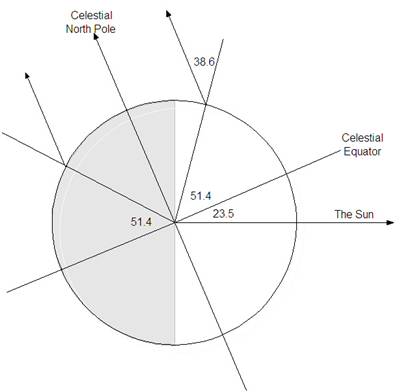
The Celestial Pole
Our planet is tilted at approximately 23.5°
to the plane of the solar system. To use
our Equatorial Mounting to good effect we must tilt the Right Ascension axis of
the mounting so that it points in the same direction as the axis of Earth
(towards Polaris). The mounting has a
tilting mechanism built in to make it easy for us.

The RA angle
adjustment mechanism on an EQ5 Mount
The mounting has a RA
position dial and screws to enable the RA to be set to the correct angle. The picture above shows the RA elevation dial
and the two adjusting screws.
The dial is graduated so that the latitude of
the observers location can be set in to give the correct RA setting
angle. The latitude of the observing
position can be found on a UK Ordinance Survey map or using Google Map on a
computer. The latitude of Newbury in the
UK is approximately 51.4 degrees north.
To set the mounting to this angle loosen the locking device (this may be
a clamp or a lock-nut on the adjusting screws). Screw the adjusting screws in or out to raise
or lower the RA until 51.4° is aligned with the pointer then lock RA adjuster.

The RA angle
adjustment mechanism on an EQ1 Mount
This setting will be good enough for initial
set up but more accurate adjustment can be carried out when we are ready to
start observing. Return the telescope to
face south.
The next step is to align the finder with the
main telescope. Most entry level
telescopes are supplied with a Red Dot finder or perhaps a 30 x 8 telescopic
finder. The more expensive models have a
50 x 8 telescope.
The finder is fitted into a location DoveTail which is normally part of the focuser unit. Fit the finder as shown below.
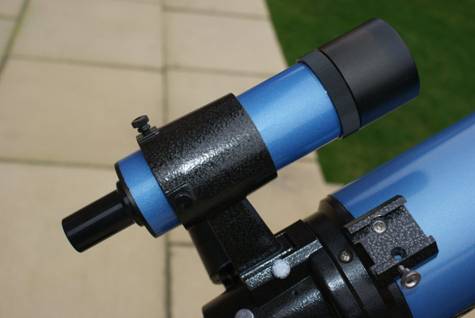
The Finder mounted to
the main telescope
Fit a low power
eyepiece (25mm) into the focuser unit.
Locate a bright star or planet and aim the telescope at this
object. Look along the telescope tube,
release the clutches and roughly align the telescope on the object. Gently move the telescope around while
looking through the eyepiece until the object appears. Lock the telescope clutches. Use the slow motion drives to centralise the
object in the eyepiece. Look through the
finder and use the adjusting screws to centralise the object. Re-centralise the object in the main telescope
and centralise in the finder again. When
alignment is complete the finder is ready to use.
Move the telescope away from the object then
use the finder to find the object and make sure it is also in the eyepiece.
Now to continue the theme of polar alignment
we will think about more accurate alignment.
To do this we must have a clear view towards Polaris (the Pole Star)
because we will be aligning on Polaris.
If the telescope needs to be moved to a different position it must be
re-levelled and aligned on north.
The heavier EQ mountings (EQ3, EQ5 and EQ6)
have a hollow shaft on the RA axis. This
means it can be used to align on Polaris by simply looking up through the
shaft. The EQ1 and EQ2 may not have a
hollow shaft so very accurate alignment is more difficult.
First rotate the RA and Dec until the
telescope main tube is pointing north and lock the RA. Lower the tube until it is level with the
ground. Position a bubble level gauge on
top of the tube (it can be secured using elastic bands, Velcro or adhesive
tape). Adjust the telescope tube until
it is horizontal as shown by the bubble being central in the gauge and lock the
Dec.
The Dec axis has a graduated barrel to
indicate its elevation. This barrel can
normally be rotated so rotate it until 0 is aligned on the arrow mark. Release the Dec clutch and raise the tube
until 51.5° is aligned on the arrow mark as accurately as possible and lock the
clutch.
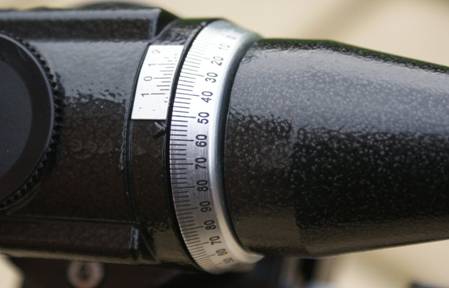
The Declination
Indicator Barrel
Look through the
finder and Polaris should be visible. If
Polaris is not central then bring it to the centre using the RA angle adjuster
on the mounting to move up or down. To
move Polaris right or left slacken the Clamp Nut that secures the mount to the
Tripod. Use the fine adjustment knobs to
rotate the mounting right or left. The
EQ1 Mount will need to be gently rotated by hand as it has no fine
adjustment. When Polaris is centralised
in the finder look through the main telescope and centralise Polaris in the
eyepiece using the RA and Dec adjusters.
Re-tighten the clamps and return the telescope to the south facing
position.
On an EQ5 look up
through the RA shaft to check that Polaris is in the centre. (The Dec must be
raised to align the hole in the Dec axis shaft to allow sighting on Polaris.)
The mounting should now be aligned accurately enough for optical use, for short
exposure photography and webcam imaging.
To check the
alignment select any object in the middle of the southern sky. Release the RA and Dec clutches and locate
and centralise the object in the finder.
Lock the clutches and use the fine adjustment drive knobs to centralise
the object in the finder. Look through
the eyepiece of the main telescope and centralise the object using the fine
adjustment drive knobs. Remove the low
power eyepiece and fit a higher power eyepiece, perhaps 10mm. Allow the object to drift through the field
of view.
When it reaches the
edge of the field of view use the RA fine adjustment drive knob to move the
object to the opposite edge of the field of view and allow it to drift across
again. Do this a number of times (for
about 5 minutes). The object should not
have moved up or down by any significant amount.
The telescope should
now be ready to use. There are other
methods of alignment that can be used to obtain even finer accuracy in aligning
the RA for long exposure imaging. These
processes are more complicated and are not required for visual observations but
will be covered in later articles.
Once the RA Polar
Alignment has been satisfactorily set, it does not need to be adjusted again
for future observing sessions. It will
only be necessary to level the tripod mounting and align it to north.
Now for some extra
words of advice before starting to observe:
If it is intended to
use the same position to observe regularly it is worth making marks where the
tripod legs are. By positioning the
tripod on the same spots each time the process of setting the telescope level
and aligned on north can be avoided.
If possible the
telescope should be set up on a paved area as this prevents the tripod legs
sinking into soft ground and avoids slipping in the dark. It would also be preferable to have the
telescope overlooking a grassed area because there will be less heat turbulence
from the grass. The edge of a patio or
on a path would be a good position.
Brick walls and
buildings close to the observing position can retain heat from sunshine during
the day and cause heat convection currents in the cold night air. Moving air currents can cause shimmering and
degradation of the image.
Avoid lights that
shine directly on to the observing position especially from the south. If there are unavoidable lights then set up a
screen using canes and sheets or towels to stop the light shining directly into
the observers eyes.
Set up at least 30
minutes before the intended observing start time. This gives the telescope time to cool down to
the ambient temperature and produce good images.
Keep the dust cover
on the telescope until it is time to start observing. It will help to avoid dew forming on the lens
of a refracting, Schmidt-Cassegrain or Maksutov telescope.
Make sure all the
equipment that might be needed is to hand before starting. This is to avoid going indoors and spoiling
the night vision. It takes about 20
minutes for our eyes to fully adapt to the dark but less than a second to lose
it.
If possible use a
chair at the telescope it is more comfortable and steady. It is more difficult to stand still to look
through the eyepiece than it is to sit still especially for prolonged periods.
If a star chart is to
be used only use a fairly dim red light or else the long sought after full dark
adaptation could be lost.
It is useful to make
an observing plan before starting to observe.
Notes of what is intended to be observed can be in the form of written
notes or as a chart with notes. This
avoids trying to think about what to look at next. Of course this need not prevent slow sweeps
across the sky just to marvel at the stars as they pass through the field of
view. It is well worth getting a
planetarium application for your computer to check out what is available to
look at from night to night.
Last and as important as all the above, do
dress to keep warm even on a mild night.
The cold can soon begin to spoil the evening if it is not kept out from
the start.