Other articles in this series
BUYING
YOUR FIRST TELESCOPE
The
first piece of advice given to people considering buying a first telescope is
always to contact your local astronomical society and go along to one of their
meetings. All astronomers will be happy
to let you have a look through their telescopes to help you decide what to buy.
Before
looking at the range of telescopes that is available, there are two important
factors to be considered. First: how
much can be afforded to buy the telescope and second what is it primarily going
to be used for. The worst possible
choice is the one that never gets used. A
telescope that is too complicated and expensive or too cumbersome to set up
will spend most of its time at the back of a shed or garage and never be
used. The first telescope should be easy
to set up, easy to use yet give impressive views of the sky. Very few astronomers get rid of their first
telescope when they upgrade to a larger one, they keep it to take when they go
out to observe.
Possible
uses to be considered are:
General
interests in looking at objects around the night sky
Special
interest in studying the Moon and the planets
Searching
out deep sky objects (clusters, nebulae & galaxies)
Possible
use for astro-photography
Does
the telescope need to be portable?
Before
starting to look at the many instruments on the market there are a few
guidelines to keep in mind:
First
guideline is - do not buy a cheap telescope from a high street shop. The minimum sum required to purchase a new
first telescope that is worth having for astronomy must be in the region of £150
to £200 (second hand telescope will be less).
This sounds a lot of money but it will buy a very useful telescope that
will not be a disappointment and will not be confined to the back of the shed
or discarded in the attic.
Second
guideline a first telescope should have a minimum aperture of at least 90mm
for a refractor or 130mm for a reflector if finances permit. This will ensure that the instrument can
capture enough light to enable faint objects to be seen.
Third
guideline The telescope should have a focal length of about 1,000mm for a
general purpose instrument. About 750mm
will be best for a more specialised wide field telescope for deep sky
objects. A longer focal length may be
considered if planetary studies are to be the main purpose for the telescope.
There
is one final point to for consideration. if the telescope is
to be used for astro-photography then it should be
mounted on an Equatorial Mounting.
This is required if longer exposures are to be taken with a camera
fitted in place of the eyepiece.
There
is also a misconception about the term Magnification. Strictly speaking magnification is not an
attribute of the telescope it mainly depends on the eyepiece being used. A telescope of a specific focal length will
produce an image of a specific size and this cannot be changed. For example a telescope of a certain focal
length may produce an image of the full moon 10mm in diameter. A longer focal length will produce a larger
image and a shorter focal length will produce a smaller image. The eyepiece is then used, much like a
microscope, to magnify that image.
Starting with a larger image from a long focal length telescope will
allow an eyepiece of a certain focal length to produce a more detailed and
effectively a higher magnification, than the same eyepiece used on a telescope
with a shorter focal length.
A long focal length 25mm
(low power) eyepiece used on a 1000mm telescope will produce a magnification of
1000 ÷ 25 = 40x. A short focal length
10mm (high power) eyepiece used on the same 1000mm telescope will produce a
magnification of 1000 ÷ 10 = 100x.
However the same eyepieces used on a 1500mm focal length telescope (that
naturally produces a larger image) will have magnifications of: 1500 ÷ 25 = 60x
and 1500 ÷ 10 = 150x.
To
summarise, if the craters on the Moon or the cloud bands on Jupiter are to be
studied then a telescope with an effectively long focal length should be
sought. A shorter focal length telescope
will be more suited to wide field views of the stars. A good all round first telescope should have
a focal length of around 1000mm to 1200mm.
The
different types of telescopes available were discussed in other articles in
this series but some of the most important design features are summarised here:
There
a two fundamental designs for telescopes these are Refractors (telescopes that
use a lens as the main optic to capture light and focus it into an image).
A
typical Refracting Telescope
The
second type of telescope is the Reflector that use a
concaved mirror to gather light and direct the light into a focused image.
A
typical Reflecting Telescope
REFLECTING
TELESCOPES
Reflecting
telescopes are generally cheaper than the equivalent sized refracting
telescope. This is because they use a
mirror as the main optic and not a more expensive lens. A mirror only has one surface to be ground
and polished but the typical refractor, that has two or sometimes three lens
elements, has four or up to six surfaces to be ground and polished.
The
cheapest and simplest reflecting telescope is a Newtonian tube assembly mounted
on a Dobsonian mount.
The mount is a simple Alt azimuth with a turntable for rotation and a trunnion for up and down movement. These are very easy to set up and simple to
use. This type of mount is used by many
amateur astronomers who build their own telescopes because it is so simple to make.
Because
the Newtonian has a secondary mirror at the top of the tube there is a small
loss of light so a 130mm will give a just slightly brighter image than a 100mm
refractor.
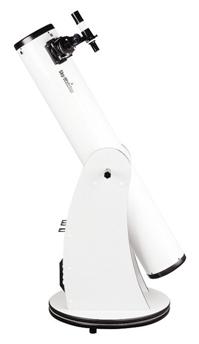
The Skywatcher Skyliner 150mm FL
1200mm £219
Discontinued
but can be obtained second hand.
Skyliner 200mm (8″) FL 1200mm £299
Skyliner 250mm (10″) FL 1200mm £469
Skyliner 300mm (12″) FL 1500mm £699
Other
manufacturers may still have a similar range.
A
major advantage, beside the cheapness, of the Dobsonian
is its simplicity of use. It just needs
to be placed down on a flat surface and it is ready to use. A finder scope is attached to the main tube
to help find a desired object. Once the
object is located in the main telescope it can be tracked by moving the tube
gently, up or down and around while looking through the eyepiece to keep the
object central.
The owner can soon master
the technique of moving the telescope manually to track an object as it appears
to move across the sky. The usual method
is to move the telescope towards the east until the object is at the east side
of the field of view. As the image is
optically reversed this means the object has to be moved to the right of the
field of view. The object is then
allowed to drift across the field of view until it is about to disappear. The telescope is then moved again.
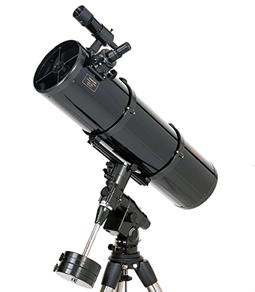
The
Newtonian tube assembly can also be fitted to an equatorial mounting. This does make the telescope more expensive
but can make it easier to track objects across the sky. This combination gives the advantage of a
large aperture telescope on a mount that can easily be driven to track
objects. Most Dobsonian
telescopes use a fairly long focal length tube assembly whereas a shorter focal
length is generally favoured for the equatorially mounted Newtonian.
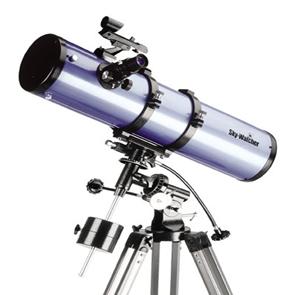
Skywatcher Explorer130
FL 900 Equatorial Newtonian £169
Models
in this range:
Explorer
150P EQ3 150mm (6″) FL 750mm £319
Explorer
150PL EQ3 150mm (6″) FL 1200mm £319
Most
of the larger manufacturers have a similar range.
As
previously stated the main advantage of an equatorial mounting is in its
ability to track an acquired object across the sky using just one drive. The mount has two rotating axes. In the image above the shaft with the optical
tube at one end and the counter balance weight at the other is called the
Declination (Dec) axis. This is used to
elevate the telescope or move it down.
The axis that is parallel to the telescope tube is called the Right Ascension
(RA) and is used to move the telescope from east to west or west to east.
The
object to be observed is first found by pointing the telescope, by eye, in the
approximate direction. Most equatorial
mounts have a clutch release mechanism that allows the telescope to be slewed
freely with the drives disengaged. With
the clutches still released the object is located at the centre of the finder
scope (the small telescope attached to the main tube). The RA and Dec drive can then be engaged by
tightening the clutches. The required
object should be visible in the main telescope eyepiece. Using the RA and Dec drives the object can
then by centred in the main telescope.
Once centred, the object can be tracked by adjusting the RA drive only.
Most basic equatorial mounts
are supplied with manual drives on RA and Dec.
Electric motor drives can be fitted when purchased for additional cost
or can be fitted as upgrades at a later date.
An electric drive is not necessary on the Dec axis but a driven RA is
very useful to save continual manual tracking of objects being observed. With the mounting set up approximately level
and closely aligned on the north polar axis tracking for in excess of 20
minutes without manual adjustment is easy to achieve.
REFRACTING
TELESCOPES
Refracting
telescopes are generally more expensive than reflecting telescopes but they do
have some advantages over their cheaper cousins. Firstly the main optic (the lens assembly) is
mounted in the tube by the manufacturer and should remain there untouched for
the life of the telescope. The mirrors of
reflecting telescopes do need to be collimated from time to time. Being enclosed in a tube the internal
surfaces of the lenses can stay clean for a long time and may never need
cleaning. The outer surface of the lens
assembly may need a gentle clean every few years but this is a relatively easy
thing to do.
There
is also an optical advantage due to the requirement of a reflecting telescope
to have a secondary mirror in the light path to direct the gathered light out
of the tube to a viewing position. This
secondary mirror is an obstruction in the light path and reduces the amount of
light available to the observer. A short
focus reflecting telescope needs a larger secondary than a long focal length
instrument. The presence of the
secondary mirror also slightly reduces the quality of the image compared to a
refracting system that does not require a secondary optic and is therefore
obstruction free. For these reasons the minimum
aperture for a refracting telescope should be 90mm whereas 130mm is recommended
for a reflecting telescope.
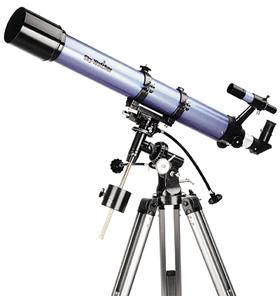
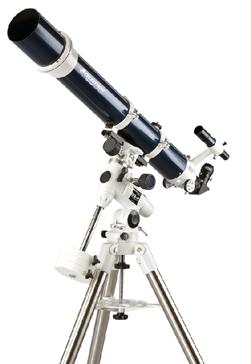
The Skywatcher Evostar 90 on EQ2
Mount
This
telescope represents the minimum specification for a first refracting scope for
a beginner. It has an aperture of 90mm
and a focal length (FL) of 1000mm. It is
supplied with a tripod fitted with a basic EQ2 (equatorial mounting), two
eyepieces, even a camera adaptor. The
MRP is about £160.
Other
telescopes in this range are:
Evostar
90 EQ3 FL 900 £250 A little small (but ok)
Evostar
102 EQ3 FL 1000 £329 Perfect
Evostar
120 EQ3 FL 1000 £379 A bit expensive
Evostar
150 EQ5 FL 1200 £778 Big and expensive
Most of the larger manufacturers
have a similar range. The telescopes in
these ranges are typically supplied on a tripod and with an equatorial
mounting. They usually have two
eyepieces (25mm and 10mm) and sometimes include a Barlow Lens. All are supplied with a 90° Star
Diagonal. This is a mirror set at 45° to
direct the image into a comfortable position for viewing through the eyepiece.
SO
WHAT SHOULD YOU BUY?
A
first telescope must be easy to use, portable enough to move around and set up
and be within a modest budget. The
budget available is important but if possible at least £200 should be spent on
a new telescope or the pro-rata amount for a second hand instrument (say £100
for a telescope that costs £200 new). Avoid the models that are sold in high
street stores as they tend to be poor quality.
Some
of the best manufacturers to look out for are:
MEADE,
CELESTRON, ORION, SKY WATCHER, TAL, KONUS and BRESSER. Suppliers of these telescopes can be found in
the adverts in popular astronomy magazines such as Astronomy Now and Sky at
Night.
Modern
telescopes bought from reputable manufacturers are all good quality these days
so it is difficult to choose from the huge and varied selection available. The choice between reflecting and refracting
telescopes is really a matter of choice, bearing in mind the advice given
previously regarding comparative aperture size.
A reflector should, if finances permit, be over 90mm and a reflector
over 130mm. A general purpose telescope
should have a focal length of around 1000mm.
An equatorial mounting is desirable as it will make tracking an object
easier.
Do
not spend too much money on a large or complex telescope as a first
scope. Using the telescope on the cold
damp winter nights (which are the best for observing) does not suit everyone so
a starter scope will provide a relatively low cost trial for the hobby with not
too much to lose. Like most equipment
bought for a hobby the telescope can always be upgraded later.
The smaller examples are usually supplied
with a Red Dot Finder or a 30mm aperture finder scope whereas a 50mm aperture
finder telescope would be better but this can be upgraded later. The cheapest equatorial mountings are usually
good enough to start out with but once the new astronomer becomes more
discerning a heavier and more robust mounting can be fitted to make the
telescope more stable. This will be
required if astro-photography is to be an interest.
There are other telescopes available with
60mm to 70mm aperture that are not bad if only a small budget is available (£60
to £100). Their capability is however really
limited to observing the Moon or the moons of Jupiter. They may also just be able to give a glimpse
of Saturns ring system on a good night.
If anyone is considering buying a telescope
for someone as a Christmas present then the best advice is to contact a local
Astronomical group. The members will
always give advice freely and usually offer a look through their telescope and
those of other members so a practical comparison can be made.
Almost any telescope has the wow factor when
first used, particularly if used to look at the Moon. However if it is too small it may soon become
a disappointment if the wonderful objects talked about in books and magazines
cannot be seen. This is why a minimum
aperture is recommended. The extra cost
of a worthwhile telescope can be made more acceptable when the instrument is
used by the whole family and friends.
Almost everyone will want to have a look when it is set up.
The details of the types of
telescopes mentioned in this article can be checked out on websites and can be
purchased through mail order. They do
need to be assembled but this is generally an easy task. Advice for Assembling a First Telescope, Setting
up a new telescope and Using a telescope for the first time, is given in
other articles in this series.